Search This Blog
Tuesday, July 27, 2010
Monday, July 26, 2010
AfterEffects

1) the first step in creating your 2d version is to import your files. When bringing in your .ai (illustrator files are easier to import into AfterEffects in multiple layers) file of your logo, make sure to file>import>file and after you choose your file and before you click open make sure to change the "import as" option from footage to composition. This will ensure that your layers stay separated and are not merged into one. Thus allowing you to manipulate, change, move, rotate, etc. all aspects of your logo.
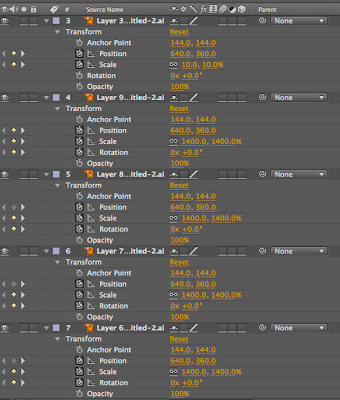
2) every layer has a transform option as shown in the picture above. clicking allows you to change the position, scale, rotation, and opacity of each layer. Allowing for a dynamic video clip. (the stopwatch icon must be clicked in order for the affect to be recorded)
3) after you have completed your logo animation and have imported your sound and video clip amongst the 2d version, you can export it as a quicktime video.
4) email me at eh.newmedia@gmail.com with any questions.
*youtube tutorials can be most helpful when your in a tight spot.
Tuesday, July 6, 2010
KOBA VIDEO
This is a low quality version of my video.
When shooting your video make sure to capture a sequence that will compliment but not overpower your logo and type face. You can use video editing software to change the speed of the movement captured as well as add different effects and hues to your video. I used final cut express which takes some getting used to, but there are tutorials online that can help you learn to edit and manipulate your background video.
When shooting your video make sure to capture a sequence that will compliment but not overpower your logo and type face. You can use video editing software to change the speed of the movement captured as well as add different effects and hues to your video. I used final cut express which takes some getting used to, but there are tutorials online that can help you learn to edit and manipulate your background video.
Make sure to cut your final video down to 10 sec
Tuesday, June 22, 2010
Mixing Music

Your Powerpoint presentation is completed and your ready to continue into your 3D animation. before you can start composing your video you need to create a 10 sec music clip using royalty free music from the web. Your music should be composed of at least three different instrumental tracks (no words), each representing one of your countries and their musical background/history.
Make sure to choose simple tracks so that they converge into a more unified musical statement.
You can use Sound Studio to mix your music, but i prefer garageband simply for its user friendly interface when it comes to mixing multiple tracks.
*FINDING FREE and ROYALTY FREE tracks online is NOT EASY
but I found a great site => www.freesound.org
*screen shot of site at top of post
You have to join, but its free and takes 10 sec.
When you find the tracks you like, just right click on the download button at the top right of the page and click "download linked file"
Monday, June 21, 2010
Power Point Presentation
Once you have constructed your final logo and type representation its time to create the presentation for your newly created brand.
Its very easy to create a powerful and direct presentation by creating backdrops, buttons, menu bars, etc. using Photoshop. Photoshop will allow you to customize every part of your presentation and help your presentation to steer clear of a template appearance.
In Powerpoint you can click on the view tab and open up the custom animation toolbar to help you create entrance/exit/etc. effects for certain elements of your powerpoint.
Even though all of these added elements can help punch up a dull powerpoint, be sure not to go over board. Keep it simple and clean, and make sure it holds somewhat of a rhythm. A rhythm can be kept by holding consistent formatting, font choices, font sizes, animation effects and so on.
Sunday, June 20, 2010
Subscribe to:
Posts (Atom)

